
Originally I was going to buy a commercial mount, I had even selected a reasonable looking universal mount that was fairly economical ($75 delivered). Then I stumbled across a reference to the Monkey Man DIY mount. From there I quickly found a reasonably summary of DIY mounts which convinced me to take this route.
Also considering I build a DIY mount for my 165lb CRT projector, I’m not overly concerned about the 12.3lb Epson 1080UB.
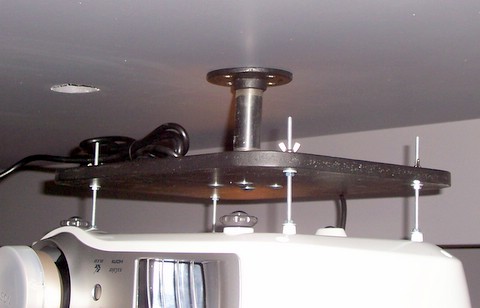
Here is my finished mount:
The sub $30 parts list
(2) 3/4″ floor flange
(1) 3/4 x 3.5″ Black steel pipe
(4) 1/4″ x 1.25″ locking nut, washer, carriage bolt
(4) #10 wood screws 1.5″ long
(1) M4 threaded rod
(8) M4 nuts
(4) M4 wingnuts
(12) 1/8″ washers
(1) 5/8″ shelf board
It was relatively easy to put together – and I was able to mount it solo without any scary moments. I’d strongly recommend going the DIY mount route, it really didn’t take a lot of work and I’m very pleased with the result.
Construction details follow..
This is a picture of the parts I used, minus the 1/8″ washers which I added during the construction process. As you can see, this is a very basic collection of parts, you should be able to easily modify it for your own needs.

The shelf board I had, but I included the cost of a new one in my price estimate. I spent less than $20 putting this together. Many of the other DIY mounts go for plexiglass, some have used cutting boards, I looked for something suitable – but felt that the 5/8″ board was the best choice for my mount.
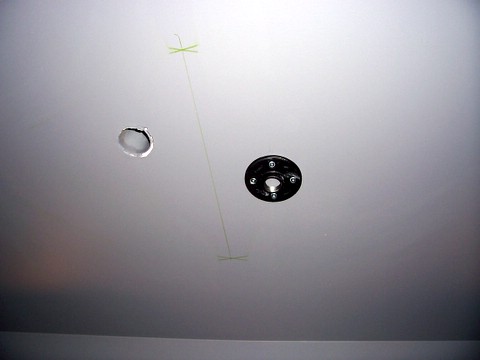
The 1st flange screwed to the ceiling. You can see the line marking the center of the screen/room. To create this line, I used a tape measure (pulled tight) held at the top left corner of the screen – then marked an arc at a given distance. Then I drew a 2nd arc about 20 inches longer. Repeat for the top right corner of the screen. If you do this correctly, you’ll get two X’s which you can draw a line through. This line will be perpendicular to the screen surface.
I only needed 1.5″ wood screws, others may want to use longer depending on how they are going to secure the flange to the ceiling. The Epson manual recommends that the mount can hold 85lbs (static weight), so drywall alone will not be enough. When I built my theater, I did a double layer of drywall. On the ceiling – it is 1/2″ plywood, covered with 1/2″ drywall. The plywood is strong enough to support the projector mount, so I was able to ignore finding a joist.

I used a hacksaw to cut the M4 threaded rod into 4″ lengths, and then threaded them into the 4 mounting holes provided on the Epson 1080UB. The mounting holes on this projector have a solid bottom (no worries of hitting a circuit board), I put them in finger tight. Then stacked a washer, and a nut to ‘lock’ the rods to the projector. No need to crank this super tight, just a gentle tweak with a wrench.
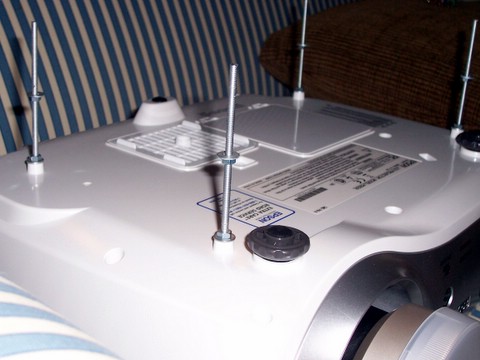
Now more nuts followed by washers. I spun them down to about the 2″ level, this gives more air clearance than table mounting – and leaves a generous amount of rod on top. The nuts will allow me to lock the projector to the board once I’ve finalized the position.
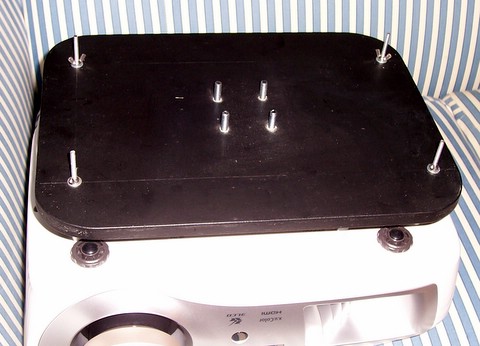
I used a jig saw to round the corners on the board, Tremclad flag black paint pretty it up (I also painted the flanges with the same). The Epson 1080UB user guide provides the mounting hole distances in inches – totally useless. The TW2000 user guide (European) gives the spacing in metric – the holes are in a perfect rectangle 30cm x 16cm. The same guide also specifies M4 threading, which seems to be omitted in the guide I have.
You will also note the 4 carriage bolts sticking up in the middle, ready to mate with the 2nd flange. I chose to attach the projector to the board, then mount the board to the flange as that seemed easier. I topped each of the M4 threaded rods off with a washer, followed by a wing nut. The wing nut will allow for easy hand adjustment once mounted.
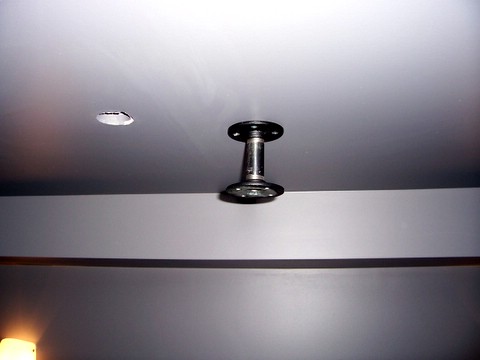
Here you can see the threaded pipe and 2nd flange mounted. One of the concerns I had originally was that I would not have rotational adjustment in any sane way. It turns out that the threaded pipe allows for a reasonable degree of rotation, without being ‘loose’ in any way. Think of it like having a bolt which is ‘tight’ to ‘really tight’ – I only needed at most 90deg of adjustment. It worked out really well.
Mounting was easy, just line up the 4 bolts to the flange – and slap the nuts on. This mount gives excellent flexibility – you can adjust the 4 wing nuts to get yaw and pitch, and the threaded pipe gives reasonable rotation.
Fantastic work! I read about this DIY mount on the AVS forum, but finding your entry just reinforces how easy and cost effective it can be. Very nice.
By the way, I’m torn between this projector and a CRT projector. Looking forward to reading your impressions of the Epson as time goes by.
Hi,
was it hard to find the M4 threaded rod /wingnuts? I just bought an epson HC720 and will use a similiar setup to mount it under a soffit in my HT/Media room. However, I’m going with a 2″ collar to get as low a profile as possible. Instead of leaving the 2″ airspace, I will probably reduce that to 1/2 – 3/4″, and use a hole cutter to put a 2″ diameter hole in the board above the airfilter inlet.
I live in Canada too… near Waterloo, ON
I didn’t have any trouble finding the M4 threaded rod. I went to one of the local specialty hardware stores that carries a wide range of fasteners. I have to admit that I didn’t even look at HomeDepot.
Like many, my home theater has a fairly low ceiling. The ‘trick’ I use to maximize headroom is to mount the projector directly above one of the couches we use for seating. Its basically impossible to bump into the hanging projector, and when seated – it not in the way at all.
Thanks for posting this, you inspired me to create my own mount as well. I couldn’t find the threaded rod so as to utilize wingnuts, but I figured I’d be able to adjust the angle fairly easily with nuts and just leave it alone once I mounted it. Here’s some pictures of the final product. 🙂 http://img139.imageshack.us/gal.php?g=projtop.jpg
Thanks for the great plans… the toughest part was finding the M4 stock… My mount worked out perfect with the same projector. It turned out for me that the wing nuts were not needed for pitch yawl adjustment and I kept the distance between the mount board to a minimum in order to keep the projector tight to the ceiling. Since I had a wood v-notch ceiling, I cut out a short piece and then mounted the flange IN the ceiling space which also kept a tight profile. Next is building a box to match the ceiling, to cover the projector when not in use.
BRAVO!
Thank you for the great plans!!!! You saved me at least $75.00 . Keep up the good info
THANK YOU THANK YOU THANK YOU THANK YOU!!!!!